


P3Dv2. At the moment it's unclear how soon Orbx will start releasing native Prepar3D v2 installers for their scenery. To my knowledge only FTX Global currently has a triple installer available for FSX/P3Dv1/P3Dv2. Some developers, such as FS Dreamteam and Flightbeam Studios for example, have been quick to update their installers, but with Orbx's extensive scenery catalogue it's surely going to take a bit of time. On top of this, I've noticed some scenery issues with tarmac covering aircraft shadows for example, so Orbx is probably going to be trying to fix these issues before rolling out Prepar3D v2 installers.
A lot of you may be struggling to install all your precious Orbx scenery into Prepar3D v2. Until Orbx updates all the installers, the following guide is a surefire workaround that should work on all current Orbx add-ons that have dual FSX/P3Dv1 installers and will allow you to install them directly into Prepar3D v2 along with an automatic scenery.cfg update.
The trick to making Orbx FSX/Prepar3D v1 scenery install flawlessly into Prepard3D v2, is to make them believe that they're actually still being installed into Prepard3D. The method I'm about to describe here is actually quite simple and just requires a view minor steps. There is also no necessity to delete FSX or Prepard3D v1 if you still have these installed, as these steps won't break anything in your FSX/Prepar3D v1 installation.
Let's get started:
Right-click anywhere on your Desktop and choose -> New -> Text Document. This will create a new text document on your Desktop.

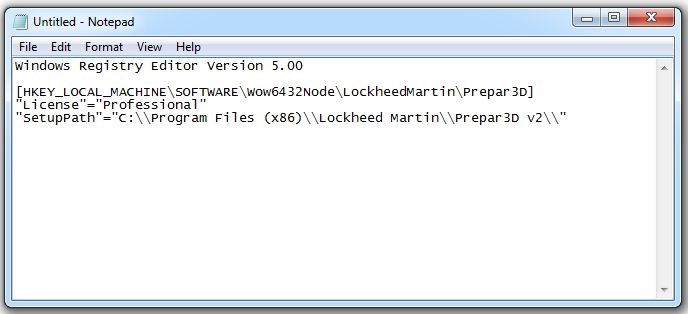
Double-click on it to open it up and enter the following text if you have a 64-bit version of Windows:
Windows Registry Editor Version 5.00
[HKEY_LOCAL_MACHINE\SOFTWARE\Wow6432Node\LockheedMartin\Prepar3D]
"License"="Academic"
"SetupPath"="C:\\Program Files (x86)\\Lockheed Martin\\Prepar3D v2\\"

For a 32-bit Windows version enter this text:
Windows Registry Editor Version 5.00
[HKEY_LOCAL_MACHINE\SOFTWARE\LockheedMartin\Prepar3D]
"License"="Academic"
"SetupPath"="C:\\Program Files (x86)\\Lockheed Martin\\Prepar3D v2\\"
If you have a Professional license then replace the word Academic with Professional.
If you have Prepar3D v2 installed on another drive, or have a different directory structure to the above, then modify the above text accordingly. Save the document and close it. Right-click on the document and choose Rename, then rename it to p3dv1tov2.reg and answer yes when asked if you want to rename it.


Now double-click on p3dv1tov2.reg and confirm with yes to add the contents to the registry.
Once you're finished with that, press the Windows Start Button and type cmd into the search field. A cmd.exe should now appear at the top of the resulting list. Right-click on the cmd.exe and choose Run as administrator.


A cmd.exe DOS prompt window should now have opened. Type in cd.. and hit Enter, then type in cd.. and hit Enter again.

You should now be seeing a C:\ on your screen.

If you do not have an existing version of Prepar3D v1, skip this next step, otherwise now type:
rename "C:\ProgramData\Lockheed Martin\Prepar3D" Prepar3D1bak

..and hit Enter. This will rename your existing Prepar3D v1 folder to enable us to do the next step, which is to type:
cd C:\ProgramData\Lockheed Martin

..and hit Enter to change to that directory. Now type:
mklink /D Prepar3D "C:\ProgramData\Lockheed Martin\Prepar3D v2"

You should now have a symbolic link that points to the above Prepar3D v2 directory. To test this, go to your Windows Explorer and open the folder C:\ProgramData\Lockheed Martin. You should see what looks like a Prepar3D directory shortcut, which is the Prepar3D symbolic link. If you double-click on this you should automatically be taken to the Prepar3D v2 directory. Don't be alarmed if you see that you're at C:\ProgramData\Lockheed Martin\Prepar3D since the symbolic link will show the Prepar3D v2 folder there as Prepar3D when you follow the link in Windows Explorer through clicking on the symbolic link.
That's pretty much it. Your Orbx Prepar3D installer will now be able to install directly into the Prepar3D v2 folder and the scenery.cfg will be updated automatically so you won't have to fiddle with any manual scenery.cfg edits.
If you need to change the registry value for Prepar3D v1 back to the original, simply do this:
Right-click anywhere on your Desktop and choose -> New -> Text Document. This will create a new text document on your Desktop. Double-click on it to open it up and enter the following text if you have a 64-bit version of Windows:
Windows Registry Editor Version 5.00
[HKEY_LOCAL_MACHINE\SOFTWARE\Wow6432Node\LockheedMartin\Prepar3D]
"License"="Academic"
"SetupPath"="C:\\Program Files (x86)\\Lockheed Martin\\Prepar3D\\"
For a 32-bit Windows version enter this text"
Windows Registry Editor Version 5.00
[HKEY_LOCAL_MACHINE\SOFTWARE\LockheedMartin\Prepar3D]
"License"="Academic"
"SetupPath"="C:\\Program Files (x86)\\Lockheed Martin\\Prepar3D\\"
As before, if you have a Professional license then replace the word Academic with Professional. Save the document and close it. Right-click on the document and choose Rename, then rename it to p3dv2tov1.reg and answer yes when asked if you want to rename it. Double-click on p3dv2tov1.reg and confirm with yes to add the contents to the registry. Voila!
To reverse the symbolic link steps simply delete the symbolic link through Windows Explorer and rename the Prepar3D1bak folder back to Prepar3D.
A great tip from D'André, if you find any of your add-on scenery has corrupted tree textures in Prepar3D v2, then go to the Settings - Graphics menu:

Change the Texture Resolution setting to the lowest available and click OK. Once you're back in the simulation, then repeat the above step, this time changing the Texture Resolution back to what it was and click OK. This is a temporary fix until Lockheed Martin remedy the problem.
If you have any questions or need help with the above, use the comment box below.
_______________________________________________
Check us out daily and like us on Facebook!
Go fly! We'll take care of the rest! Nobody has your back like AirDailyX.
daily news | reviews | first looks | billboard | interviews | comics | live broadcasts
58 comments:
Great, thanks. Would this work for the installation of aircraft as well?
You're welcome :-)
In theory yes, if the installer is pointing to Prepar3D for installation, then with the above it's going to be directed to Prepar3D v2 instead. The above will not work for installers pointing to an FSX directory, you would need to create unique symbolic links for that, but that's not too difficult to do if you understand the above.
one question what if your p3d is installed on a drive lets call E?
And isnt it the same if you just right click the folder and create shortcut and rename it to Prepar3d?
Then you replace the C with an E.
A symbolic link is not the same as creating a Windows shortcut:
http://www.techrepublic.com/blog/windows-and-office/be-more-efficient-and-better-organized-with-the-mklink-symbolic-link-tool/
Thanks man i got it !
Anytime :-)
Just a friendly word of caution. Orbx is fine with people doing this if they want, but JV is clear that they will not be providing technical support for any issues that may occur in V2.0 as a result of installing Orbx scenery in this fashion.
An unrelated question: Has anyone tried installing the Majestic Q400 in P3Dv2? Sadly, the Majestic people haven't decided what they are going to in regards to supporting P3Dv2 or not.
Todd
Hi Todd,
You make it sound like there is an alternative?
All this does is mimick a Prepar3D folder to the installer and then bypasses the need for having to do any manual editing to the scenery.cfg file. A native Prepar3D v2 installer would do nothing different as far as file placement and scenery.cfg editing is concerned!
It's old school DOS, simple, effective and right now the only other option would be to spend money on migration software, which essentially does the same thing.
Best regards,
Jerome
Thank man it work nicely the installer pointed to My custom E: p3d 2 dir. and update the scenery as it should!
You're very welcome, glad you got it working on your E: drive ;-)
Jerome, I am not disagreeing with people who want to do this, but I think people do need to be aware that if there are issues, Orbx will not provide support. The only alternative right now is to wait for the new installers to be released, but that is a long wait, I do understand.
Todd
Hi Todd,
I think what you're trying to point out is that Orbx do not offer support on their products that were put into Prepar3D v2 without one of their official installers.
If you follow my guide you will have no issues relating to the installation, you might have issues with the Orbx scenery not being V2 compatible, and that is an entirely different kettle of fish. :-)
So one has the option to see for oneself if the scenery is compatible and works, or to wait for official v2 installers.....
Best regards,
Jerome
Thanks so much now I can move all my GA flying to P3D ftxg just wasn't cutting it
Indeed.
Cheers,
Todd
Im doing something wrong. I get a "Setup can not create the following folder: \ORBX\Scripts" error windows when trying to install my orbx scenaries.
I Installed Prepar3d v2 in D:\PREPAR3DV2
I supose the only diference is the "SetupPath"="D:\PREPAR3DV2\\" in the registry. isnt it?
Hi Arturo,
You forgot that it's two \:
"SetupPath"="D:\\Prepar3D v2\\"
or
"SetupPath"="D:\\PREPAR3DV2\\"
Depends how you wrote it.
Best regards,
Jerome
ouch!!
Thank you very much.
Working perfect now..
Jerome jw will this work for ftx regions
It will work for anything that has an installer originally pointing and installing into C:\Program Files (x86)\Lockheed Martin\Prepar3D
Thanks
Hi,
I've done the tutorial and I could install the FTX Global 1.0 (old installer) and his update 1.1, but I have to add the folder of the scenery to be shown in the P3Dv2.
Later I tried to flight at night and then I could appreciate that the 3D lights are disabled. Then I went to FTX Central P3D to add the 3D lights. When I clicked to the botton "apply" I read "Unable to locate the scenery.cfg file".
Am I doing something wrong?
Thank you very much,
Regards,
Fran.
Hi Fran,
Are you sure you're using FTX Central P3D in Prepar3D v2 and not FTX Central P3D in Prepar3D to do this?
I recommend you go to the Orbx Scripts folder inside Prepar3D v2 and use the 3D lights function from there.
Best regards,
Jerome
I've followed the instructions carefully (W7 64 bit) but where it says "To test this, go to your Windows Explorer and open the folder C:\ProgramData\Lockheed Martin. You should see what looks like a Prepar3D directory shortcut, which is the Prepar3D symbolic link.", ...I can't see the link. There's just the Prepar3D v2 folder of 17.6GB. I tried doing the CMD thing again and it said I couldn't make that link because it already exists. Any ideas?
Hi Kaito,
If you're seeing a folder of 17.6GB then you're in:
C:\Program Files (x86)\Lockheed Martin
...and not:
C:\ProgramData\Lockheed Martin
...there is a difference!
The Prepar3D v2 folder inside and next to the symbolic link at C:\ProgramData\Lockheed Martin is less than 10 MB in size.....
If it said it already exists you must have done it correctly ;-)
Best regards,
Jerome
You' re right! Bloomin' ProgramData... Time to get going with my scenery then. Really appreciate your work, Jerome.
Kaito.
everyday theres news here it had become my daily routine to come here and check for update
I'm getting an error saying:
The module "ObjectFlow_SAK.dll has not been tested for compatibility with the FS version you have installed..."
If you run the module P3D crashes immediately. If you don't run the dll you miss a lot of features like grass etc.
Anyone encountered this? And how did deal with it?
Thanks, Rob
Hi Jerome, Your comment;
The trick to making Orbx FSX/Prepar3D v1 scenery install flawlessly into Prepard3D v2, is to make them believe that they're actually still being installed into Prepard3D.
What if I want to trick the DVD's to think they're being installed into FSX not into P3D1....do I change reg text doc to read fsxtop3dv2.reg? or does that matter?
Thanks
Bernie
Hi Rob,
As far as I'm aware ObjectFlow controls what is displayed based on a number of factors including season, time, wind direction etc., in a nutshell, to ensure that there are no bikinis in Alaskan winters ;-)
I remember that there were compatibility issues with this too when Prepar3D v1 was first released and before Orbx had native Prepar3D v1 installers.
The only thing you can do right now is wait until Orbx has addressed this.
Best regards,
Jerome
Hi Bernie,
I'm not sure I follow what you're asking? Normally a DVD will look at the path that's setup in the registry and follow that for installation.
Best regards,
Jerome
Hey Jerome ,At some Orbx airports its just a runway with no buildings did I do something wrong? some airports work fine while some are only missing half of the objects
Hi,
I was using FTXCentral of P3Dv2
Located in C:\Program Files (x86)\Lockheed Martin\Prepar3D v2\ORBX\Scripts\FTXCentral
I haven't installed P3D, I think it isn't necessary to be installed, isn't it?
is there an other way to activate the 3D lights?
Thank you a lot!
I forgot to mention that I had installed FTX Global 1.10 in FSX (fully working)
Hi Fran,
The 3D Lights On and Off feature is in the scripts folder at:
C:\Program Files (x86)\Lockheed Martin\Prepar3D v2\ORBX\Scripts\
Just double-click on either to use, and no, there is no requirement for Prepar3D v1 to be installed.
Best regards,
Jerome
Kaito how you fix your problem? I got the same thing no scnery .cfg found
I have the reg tweak and the symbolic link working fine.
2 questions really:
1) I understand this tricks ORBX P3D v1 scenery installers to P3D v2, great BUT am I correct in assuming that the PNW scenery installer is NOT P3D v1 and thus would fail anyway?
2) Lets say I want to install a P3D v1 ORBX scenery area AFTER I have installed the FTXGlobal Scenery that uses an installer for P3D v2. FTXGlobal installs an updated version of FTX central i.e. with the Default region GONE and I'm assuming that to go back and install OLD scenery with installers for P3D v1 would likely mess up the FTX Central arrangement?
If I'm right then this blog/post is likely to cause a few headaches for many. Hope not though?
I have no idea. If everything was fully compatible then Orbx would have released v2 installers long ago, but they haven't so.....
Hi Robert,
You must have a very old PNW installer then, as the latest one is for both FSX and Prepar3D v1.
If you have FTX Global installed in Prepar3D v2, then you would select the region to be active for where the add-on airport that you wish to install is located, ie for Australia and New Zealand scenery add-ons choose Oceania, for Canada and the USA select North America, etc. This is the same procedure used when applying Orbx patches.
Headaches are only caused when proper procedures aren't followed. The reg tweak and the symbolic link change nothing from how Orbx have always instructed their customers to install scenery and patches.
Best regards,
Jerome
A look from fax scenery.cfg and copy it to p3d2 scenery.cfg fix that
Hi I need a little help I think. After following the steps and correctly making the link inside ProgramData everything appears to be ok and the installation of OBX products seem to go with out a hitch.
However, once launching Prepar3D2 the new OBX scenery are not listed in the scenery list within Prepar3D2. I have checked the Scenery.cfg and there are new entries inside there for the OBX scenery.
Any pointers would be great.
Thanks
Hi Steve,
Did you use the FTX Central utility inside the Orbx/Scripts folder to set your region correctly after installation?
If you don't have FTX Global with Hybrid mode active, then you will need to make sure that whatever Orbx region you want to fly in, is active and not set to default Prepar3D v2.
Best regards,
Jerome
Hi Jerome
I just uninstalled Prepar3D and started from scratch. But with no luck.
I have reinstalled OBX Stapleford airport, OBX Southampton airport and OBX England FTX region.
Screenshot of the location that the installer finds after following your instructions: http://i.imgur.com/1pNKIEP.png (to me this seems ok?)
After installation of the above, Prepar3D behaves like it has found new items, a progress bar appears that it is finding new scenery. But the airports or region are still not working after this process.
The airports are being added to the scenery.cfg file as it contains the following:
[Area.126]
Title=FTX_EU_ENG_08_CUSTOM
Local=ORBX\FTX_EU\FTX_EU_ENG_08_CUSTOM
Layer=126
Active=TRUE
Required=FALSE
[Area.127]
Title=FTX_EU_ENG_07_MESH
Local=ORBX\FTX_EU\FTX_EU_ENG_07_MESH
Layer=127
Active=TRUE
Required=FALSE
[Area.128]
Title=FTX_EU_ENG_06_CVX
Local=ORBX\FTX_EU\FTX_EU_ENG_06_CVX
Layer=128
Active=TRUE
Required=FALSE
[Area.129]
Title=FTX_EU_ENG_05_SCENERY
Local=ORBX\FTX_EU\FTX_EU_ENG_05_SCENERY
Layer=129
Active=TRUE
Required=FALSE
[Area.130]
Title=FTX_AA_EGSG
Local=ORBX\FTX_EU\FTX_AA_EGSG
Layer=130
Active=TRUE
Required=FALSE
[Area.131]
Title=FTX_AA_EGHI
Local=ORBX\FTX_EU\FTX_AA_EGHI
Layer=131
Active=TRUE
Required=FALSE
[Area.132]
Title=FTXAA_ORBXLIBS
Local=ORBX\FTX_AU\FTXAA_ORBXLIBS
Layer=132
Active=TRUE
Required=FALSE
However inside Prepar3D scenery listings menu there are no listing of these. If I add them in manually then they kinda work, but there are things missing from the airports. I think I am missing items. Here is a screenshot of where I am manually added three pieces of scenery: http://i.imgur.com/4f2alqv.png
FTX Central is behaving strangely.. after opening it it states the following: http://i.imgur.com/GKbh6Cs.png
I'm not sure why it is doing this, even after uninstalling Prepar3D and the addons this is happening with FTX Central.
I really appreciate your help, I have been trying for a few hours now with no success.
Thanks
Steve
Now It works perfectly, thank you very much!
Hi Steve,
It would seem that things might be a bit jumbled between your C: and D: drive. Some questions to help me guide you to a working solution:
Do you have FSX installed, if yes, where...C:/...?
Do you have P3Dv1 installed, if yes, where...C:/...?
Are you sure you renamed existing folders correctly if these were present from P3Dv1?
Where is the ProgramData folder located that relates to your P3Dv1 installation if you have one, on C: or D:, please verify and report back.
Where is the ProgramData folder located that relates to your P3Dv2 installation, on C: or D:, please verify and report back.
That's all I have for now...awaiting your response.
Best regards,
Jerome
Hi Jerome
Thanks for your reply.
I have FSX installed on my D:/ in its default path location
P3Dv2 is installed on the D:/ in its default path location
I don't have P3Dv1 installed, it has never been installed.
ProgramData is located on the C:/ - There isn't a ProgramData folder on my D:/ drive
ProgramData contains the following and looks like this: http://i.imgur.com/gdwzqHn.png
Prepar3D folder looks like this: http://i.imgur.com/FIVNbeu.png
(Linked to the D:/ location of where Prepar3D is installed)
Prepar3D v2 folder looks like this: http://i.imgur.com/YXrBXZ3.png
The command used to make the shortcut was this: mklink /D Prepar3D "D:\Program Files (x86)\Lockheed Martin\Prepar3D v2"
The reg file that I used was this (64bit Windows):
Windows Registry Editor Version 5.00
[HKEY_LOCAL_MACHINE\SOFTWARE\Wow6432Node\LockheedMartin\Prepar3D]
"License"="Academic"
"SetupPath"="d:\\Program Files (x86)\\Lockheed Martin\\Prepar3D v2\\"
Again, many thanks for your help.. I can't grasp what I am doing wrong.
Steve
Hi Steve,
I found the problem.
My instructions clearly call on:
mklink /D Prepar3D "C:\ProgramData\Lockheed Martin\Prepar3D v2"
You write:
ProgramData is located on the C:/ - There isn't a ProgramData folder on my D:/ drive
The command used to make the shortcut was this: mklink /D Prepar3D "D:\Program Files (x86)\Lockheed Martin\Prepar3D v2"
That's wrong! The instructions for the symbolic link remain unchanged:
A cmd.exe DOS prompt window should now have opened. Type in cd.. and hit Enter, then type in cd.. and hit Enter again.
You should now be seeing a C:\ on your screen.
Now type:
cd C:\ProgramData\Lockheed Martin
Hit enter and now type:
mklink /D Prepar3D "C:\ProgramData\Lockheed Martin\Prepar3D v2"
Fix that and everything will work fine :-)
Please report back on your progress!
Best regards,
Jerome
Same problem. I change the mlink dir. I change get to default and hope it's fix
Hi Jerome
I'm really not sure how I missed that. What a fool I am!
Stapleford Airfield isn't working, but I suspect that's because it has compatibility issues. The other airports and areas are working as they should.
Thanks so much!
Steve
Hi Steve,
Glad you got it working and thanks for letting me know :-)
Best regards,
Jerome
I followed your steps and the install went perfect. Today I picked up a ssd and reinstalled P3D to the new drive "F" how can I get FTX global on the F drive? I followed the steps above again and changed them to F but it seems to install to the C drive still.
I installed Orbx PNW following your instructions but the tree textures are broken. Even the tip at the end to switch texture resolution back and forth did not fix it. Trees are displayed correctly with the very low texture setting but when I switch back to Ultra, then the trees have building textures again. Any idea?
Hi Mark,
FTX Global has a triple installer available that will handle FSX/P3D/P3Dv2, so I'm not sure how you could be having an issue with this?
Please see here for details:
http://www.orbxsystems.com/forum/topic/68439-ftx-global-v11-triple-installer-for-fsxp3d1p3d2-now-available/
I'm not sure what steps above you've changed, FTX Global should automatically recognise where Prepar3D v2 is located after your reinstall to the SSD. This guide has no bearing on software that has a native Prepar3D v2 installer.
Best regards,
Jerome
Hi I installed p3dv2 to my ssd J Drive and used your procedure for orbx, that was ok but I was getting poor performance from this drive so I uninstalled them from the J drive and installed p3dv2 on my K drive. I changed the registry file from J to K "SetupPath"="k:\\Program Files (x86)\\Lockheed Martin\\Prepar3D v2\\". Now when I run the Orbx EU installer it keeps wanting to go to J instead of K. Hope you know what I mean! Any help would be great!
Hi James,
Did you completely wipe everything that was resident in:
C:\ProgramData\Lockheed Martin\Prepar3D v2
Your new K drive installation may be picking up data from your J drive install if you didn't wipe all files and directories prior to the reinstall.
Is your symbolic link still there, did you check after your reinstall?
Is this on a 32- or 64-bit Windows OS?
Best regards,
Jerome
Hi Jerome
Wow that was quick and thanks for your response. As far as I know I uninstalled everything. I ran a registry cleaner and searched for any left over files, none found. C:\ProgramData\Lockheed Martin has the link to V2. Oh I have Q9650, Gtx470, 6 gb Ram, Windows 7, 64 bit (This spec is probably getting old hat now!!). Its looking like I may have to start again unless there is any other way to track down the problem.
Regards James
Hi again James,
There must be a typo then. Double-check that two \\ were used and go through the setup procedure one more time. Delete the old symbolic link and create a new one.
Failing that I suggest you use regedit to double-check the registry entry that was stipulated in the .reg file.
Best regards,
Jerome
Hi Jerome
The two \\ were used I will check on the other stuff you mention, Thanks for help. Bye for now.
Regards James
Thanks a lot for this guide, which I successfully used today. Even the texture problem was mentioned.
To all followers: Don't be scared if FTX Central shows the not all or too much icons. When you finally install the latest ORBX library, everything comes fine.
Daniel
Post a Comment
Comments are now deactivated. Please visit our new website: AirDailyX.net
Note: Only a member of this blog may post a comment.